
Installing Dependencies
In this part, we will be going over how to setup DVWA on the ubuntu server within the isolated network and accessing the application through Kali Linux. First, we need to login to the machine and make sure we have root privileges through ‘sudo su’. We should have all of our packages updated from before so we can skip that step. We are going to need to download some dependencies as per the DVWA github page. The command for obtaining those dependencies is listed below.
apt install php apache2 mariadb-server php-mysqli php-gd libapache2-mod-php
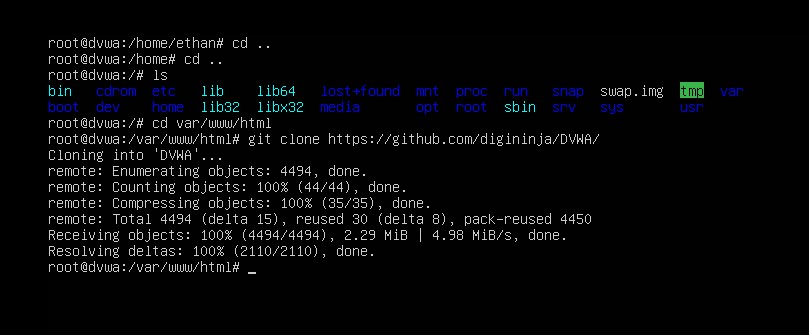
Now we need to get to the directory where we will be cloning the DVWA git repository. Enter the following commands:
cd ..
cd ..
cd var/www/html/
git clone https://github.com/digininja/DVWA
First we should remove the default ‘index.html’ file that is made when we installed apache2 so it isn’t loaded over DVWA.
rm index.html
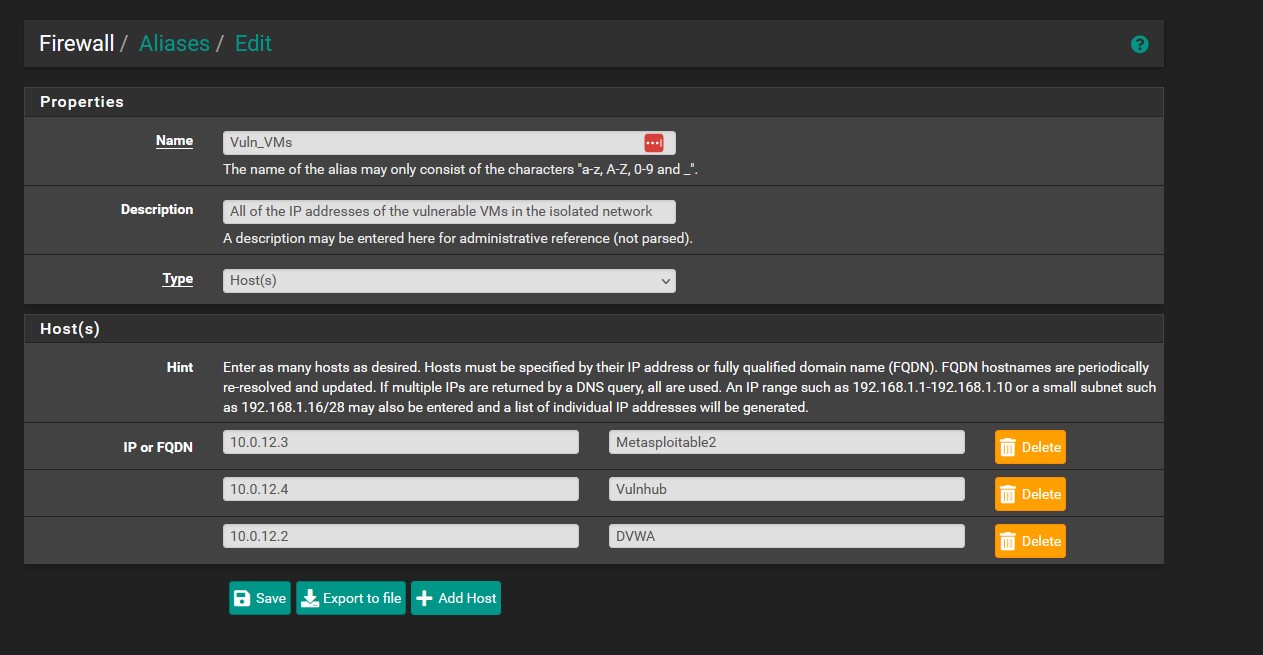
At this point we can add the DVWA vm to our alias of vulnerable machines so that outbound connections are blocked at this point. We will no longer need an outbound connection except for periodic updates at which point we can remove DVWA from the alias briefly so that it’s not affected by the ‘Vuln_VMs’ firewall rule. You could also choose to create a rule that is disabled by default that allows outbound connections from the DVWA machine and only toggle it on when those updates need to be made.
Config File & Database Creation
Now that we have the repository cloned, we should be able to see the structure of the website after we cd into it. After that, we need to alter the template file so enter the following commands:
cd DVWA/
cd config/
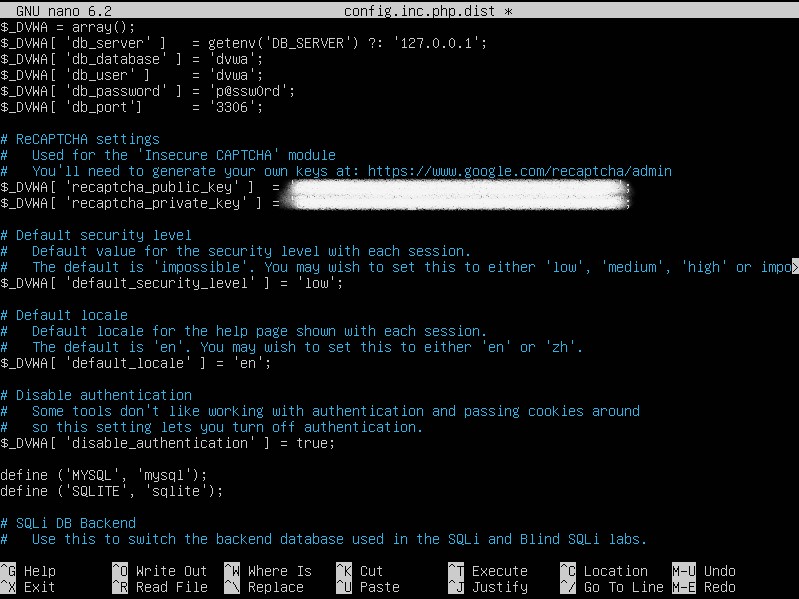
nano config.inc.php.dist

We can change a few things in the file if we so wish, such as the database name or username. I wouldn’t recommend changing the password as it’s already a vulnerable application and we don’t really need to do that. We can leave the port alone as well. The security level should be changed to reflect the difficulty we want to tackle when trying to penetrate the application. The only other three settings to worry about are the security level, authentication, and recaptcha. I will be setting the security level to ‘low’ to begin with. Disable authentication should be set to ‘true’.
As for recaptcha, we need to go to the url specified within the file to generate the keys. Give it a label and choose ‘Challenge (v2)’ and the ‘I’m not a robot Checkbox’ options as this is what’s recommended for DVWA. I’m using the loopback domain. Feel free to choose whatever you want. Once the public/private key pair is generated then we can paste them into the file on the VM. Your config file should look like the image below. Write and save the file.
In truth, what we just did is edit a template, so we need to copy the contents of the .dist file to that of an actual config file with the following command:
cp config/config.inc.php.dist config/config.inc.php
We must create a database and database user so enter the following commands (some of mine fail because I’ve already run them, but yours should be fine):
mariadb
create database dvwa;
create user dvwa@localhost identified by 'p@ssw0rd';
grant all on dvwa.* to dvwa@localhost;
flush privileges;
exit;
Accessing DVWA From Kali & Final Touches
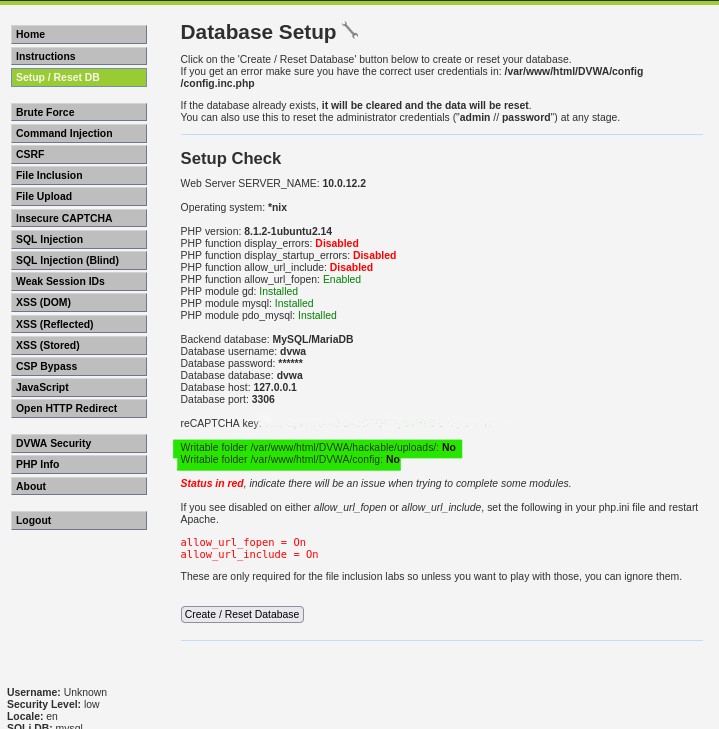
Now that our server is in working order, navigate to Kali Linux and open your browser. Navigate to ‘https://10.0.12.2’. You will see the DVWA index with a folder icon, click on it and you will be sent to the homepage for DVWA. On the DVWA homepage, click on ‘Setup/Reset DB’. Click the ‘Create / Reset Database’ button. You will also notice some PHP functions are disabled as well as two directories we need to make writeable in order for everything to function correctly. We will remedy these issues right now.
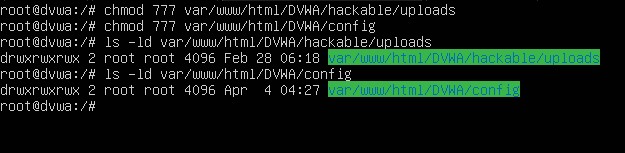
Execute the following commands as root in the root directory:
chmod 777 /var/www/html/DVWA/hackable/uploads/
chmod 777 /var/www/html/DVWA/config
You can verify the permissions by entering the following commands:
ls -ld /var/www/html/DVWA/hackable/uploads/
ls -ld /var/www/html/DVWA/config
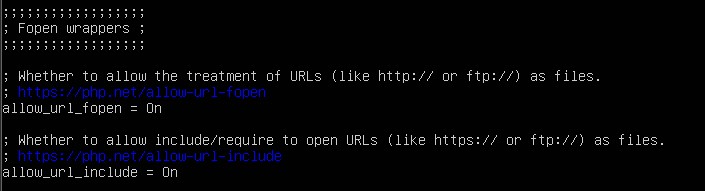
As noted before there are three php functions that are red. We only need to really worry about changing ‘PHP function allow_url_include’. We will need to change the php.ini directory to enable this function. Execute the below commands as root in the root directory. In the nano editor navigate to the ‘fopen wrappers’ section and change the permission for ‘PHP function allow_url_include’ to ‘On’. Write to file, save, and exit the editor.
cd etc/php/8.1/apache2
nano php.ini
We need to restart the server now for these changes to take effect. Once it’s rebooted, jump back over to Kali and refresh the DVWA page. We should now see the changes have taken effect. If your screen looks the image below, then congrats, you’re all done setting up DVWA!
| we will move on to setting up our Windows Server 2019 VM and making the active directory forest. You can find the next part, ‘VMWare Pro Homelab | Active Directory Forest Setup Pt. 1’, in the [blog] section of this site. |