
Welcome to the Homelab Series
Today, I will be starting the process of building my new red and blue team lab from scratch and planning out the network topology. I wanted a place where I could document the building steps so that they can be publicly available for anyone interested in building their own lab environment. Undertaking this project will be an excellent way for myself and others to gain hands-on experience with the following:
- Proper routing and network isolation techniques
- Firewall rule creation and proper order
- Virtual machine creation via hosted hypervisor
- OS installations for a variety of systems
- Setting up network services such as DNS, NTP, and DHCP
- Setting up a SIEM with agents for ingesting logs
- Deploying an IDS on a firewall
- Setting up an Active Directory Forest environment
This lab environment is my own custom variation of the base lab built in Tony Robinson’s ‘Building Virtual Machine Labs: A Hands-On Guide (Second Edition)’. If you would like to purchase the text, you can find it here on Amazon.
Why go for both red team and blue team you might ask? I think it only makes sense because each security domain does not exist in a bubble. Learning blue team fundamentals can help build on the concepts and skills involved in red team and vice-versa. If you’re someone like myself who has interest in learning DFIR, SOC, and penetration testing, then you are in luck. This lab will arm you with the tools needed to get hands-on practical experience in each specialization.
I at first considered buying a cheap used Intel NUC or BeeLink mini-pc to act as a home server that I could run VMWare ESxI, Proxmox, or some other bare-metal hypervisor on top of, but I want to keep this lab as cost-free possible for any new home lab builders. I also considered converting an old gaming PC of mine into a server, but then I would need to upgrade the RAM, not to mention I had wanted to give that PC away. I want to offer a solution that you can start TODAY with nothing more than your home workstation. The best solution then was to use a hosted hypervisor in the form of VMWare Workstation 17 Professional.
I already own the application, but the license fee for VMWare Workstation Pro currently runs at $200 USD. “Now wait a minute, I thought this was going to be free?”, is a question you might be asking right about now. Technically, it does cost money, but VMWare offers a free 30-day trial for Pro that will give you access to it’s full suite of features. After the trial has expired, you can simply downgrade as we really only need Pro’s features for setting up virtual networks.
These are the specs for my own PC:
| Hardware | Specifications |
|---|---|
| CPU | AMD Ryzen 7 5800x |
| GPU | Nvidia Geforce RTX 3060 ti |
| RAM | 32GB DDR5-5200Mhz |
| DISK | 1TB SSD |
| OS | Windows 10 Home |
and these are the minimum requirements as follows:
| Hardware | Minimum Specifications |
|---|---|
| CPU | Quad-core processor that supports virtualization through BIOS UEFI, the more cores the better |
| GPU | Whatever works, preferably a modern discrete, GPU over an integrated solution |
| RAM | 32 GB, although 16 GB could work if you don’t plan to run every VM in in the lab at once. |
| DISK | At least 512GB SSD, preferably 1TB or more for future proofing and perhaps another HDD storage device for holding our VMs and VM data |
| OS | Windows 10 or better, any modern Linux distro although this setup guide will focus on Windows 11 you could adapt it to your own standard |
Resources
Below are the links to all of the resources I plan on using in this environment. I would gather all of them now so that it won’t be a headache coming back to this post when you need one.
Obsidian is a great freemium note-taking application that uses Markdown. It is where I will be keeping technical notes for my networks and VMs. I recommend that you take notes along the way as well.
Draw.io is the web application I used to construct my network diagram. It’s very user friendly and offers a wealth of great features specifically for constructing technical diagram.
VMWare Workstation 17 Pro is the hypervisor we will be using for this homelab. Download it from the link above
pfSense is a router/firewall software solution that is based on FreeBSD. We will be spinning it up on a VM. The Community Edition is free and has everything that we should need.
Wazuh is a free, open source SIEM solution that offers an easy-to-use security dashboard with a host of various features. We will be using it to ingest events/logs from Suricata/Windows. The preconfigured OVA is the installation we want.
Kali Linux is an offensive focused, Debian-based distribution of Linux. Any security homelab is going to want this in their arsenal. The 64-bit installer image is the one you want.
Metasploitable2 is an intentionally vulnerable Linux VM which we will be setting up in our isolated network.
Damn Vulnerable Web Application, or DVWA, is just as it states. It’s a damn vulnerable web application which is used for web hacking.
Ubuntu Server 22.04.3 LTS will be used as the OS DVWA is built upon.
VulnHub offers a range of vulnerable by design VMs. We are going to include one in our isolated network. Feel free to choose your own. I will be using Symfono:1.
Windows Server 2019 will be used as the domain controller in the active directory network. Microsoft offers free ISOs for Windows Server and Enterprise edition. You will have to register an account with Microsoft Evaluation Center before you can download.
Windows 10 Enterprise we will have two windows 10 client machines in the AD network.
Topology Diagram & Explanation
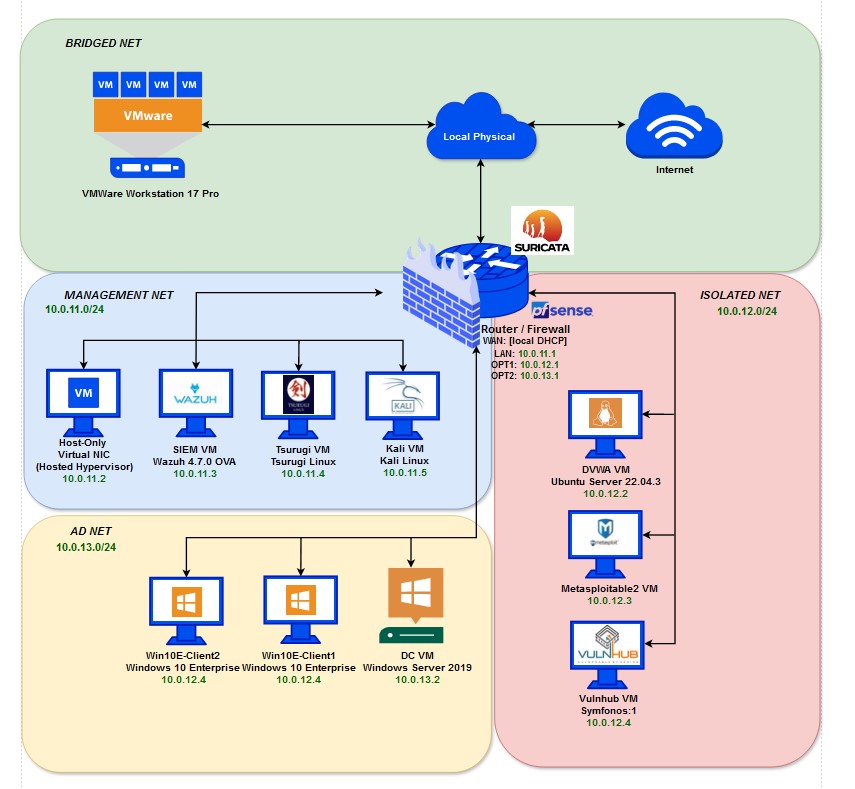
This homelab will consist of ten virtual machines spread across three sub-networks that we will allocate via pfSense’s routing capabilities. I will explain each segment in more detail below.
- pfSense Virtual Router & Firewall
The pfSense virtual machine is the glue of this lab. We will have three separate VMnets created through VMWare’s virtual network editor that will correspond with LAN (10.0.11.1), OPT1 (10.0.12.1), and OPT2 (10.0.13.1) adapters within pfSense. A bridged connection on the ethernet/wireless adapter of choice will be used to bridge the connection to our home network. Suricata will be deployed as a service on pfSense’s web interface in order to ingest logs from each subnet. The pfSense machine will act an agent for our Wazuh SIEM to forward those logs to the Wazuh server. The LAN VMNet will employ a host virtual network adapter at 10.0.11.2.
- LAN - Management Subnet
This subnet consists of three machines. Kali Linux, Tsurugi Linux, and a Wazuh server. The Kali Linux machine (10.0.11.5) is the living, beating heart of the management network. We will be able to monitor security events through the Wazuh dashboard or launch attacks on the machines in the vulnerable and active directory subnets from Kali. The Wazuh server (10.0.11.3) will be configured as an all-in one solution with server, indexer, and dashboard on one machine. Tsurugi Linux (10.0.11.4) will be used for performing various DFIR tasks. Firewall rules will be configured to allow outbound HTTP/HTTPS connections as well as allowing the Kali machine access to other internal subnet machines. This subnet will occupy the address range of 10.0.11.0/24.
- OPT1 - Vulnerable Subnet
This subnet consists of three more machines. One for our Apache2, DVWA web server (10.0.12.2), one for MetaSploitable2 (10.0.12.3), and the last for our Symfonos:1 VulnHub virtual machine (10.0.12.4). Network isolation will be enforced via firewall rules preventing outbound connection from this subnet as these machines are highly vulnerable. The DVWA server will accessible from Kali for the purpose of launching web exploits. The VulnHub and MetaSploitable boxes will also be used for various red team, penetration testing purposes. This subnet will occupy the address range of 10.0.12.0/24.
- OPT2 - AD Subnet
This subnet will house another three machines. A Windows Server 2019 installation that will be deployed as a domain controller and certificate authority (10.0.13.2) and two Windows 10 Enterprise client machines (10.0.13.3). The windows clients will be joined to the domain to create a vulnerable AD forest for ethical hacking. Several service accounts will be created, several ports will be opened, and the firewall on the DC will be disabled to allow for a wide variety of attack avenues. pfSense will act as the default gateway for our DC. The DC will also act as an agent for our Wazuh server so that we can view Windows Event Logs in the Wazuh dashboard. This subnet will occupy the address range of 10.0.13.0/24.
| We are ready to begin the project. You can find the first post, ‘VMWare Pro Homelab | VMWare Setup’, in the [blog] section of this site. |