
- webConfigurator Setup Wizard
- Enabling Network Services
- DNS Query Forwarding
- Enabling NTP
- Firewall Alias and Firewall Rules
webConfigurator Setup Wizard
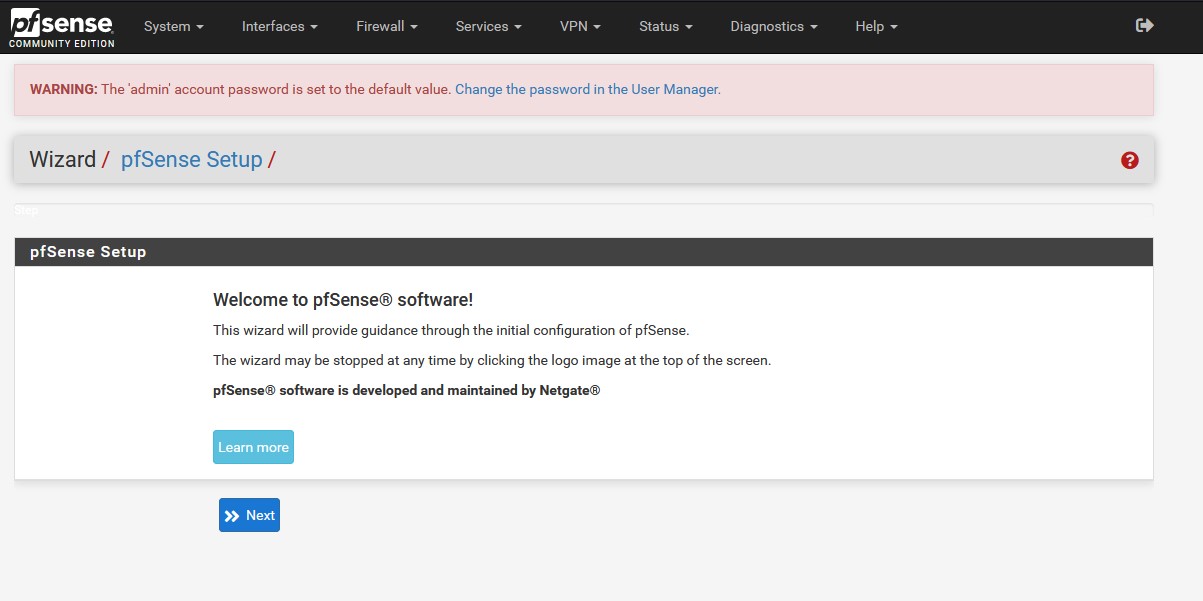
This post focuses on using pfSense’s web application interface, the webConfigurator, to setup pfSense, enable services, and create firewall aliases/rules. To access the webConfigurator, go to 10.0.11.1. Accept the risk and you will then be greeted with the login page. The credentials are set to the default, so input ‘admin’ for the user and ‘pfSense’ for the password. Once you’re in, you will immediately be placed in the pfSense Setup Wizard. Click ‘» Next’ twice to get to the ‘General Information’ screen.
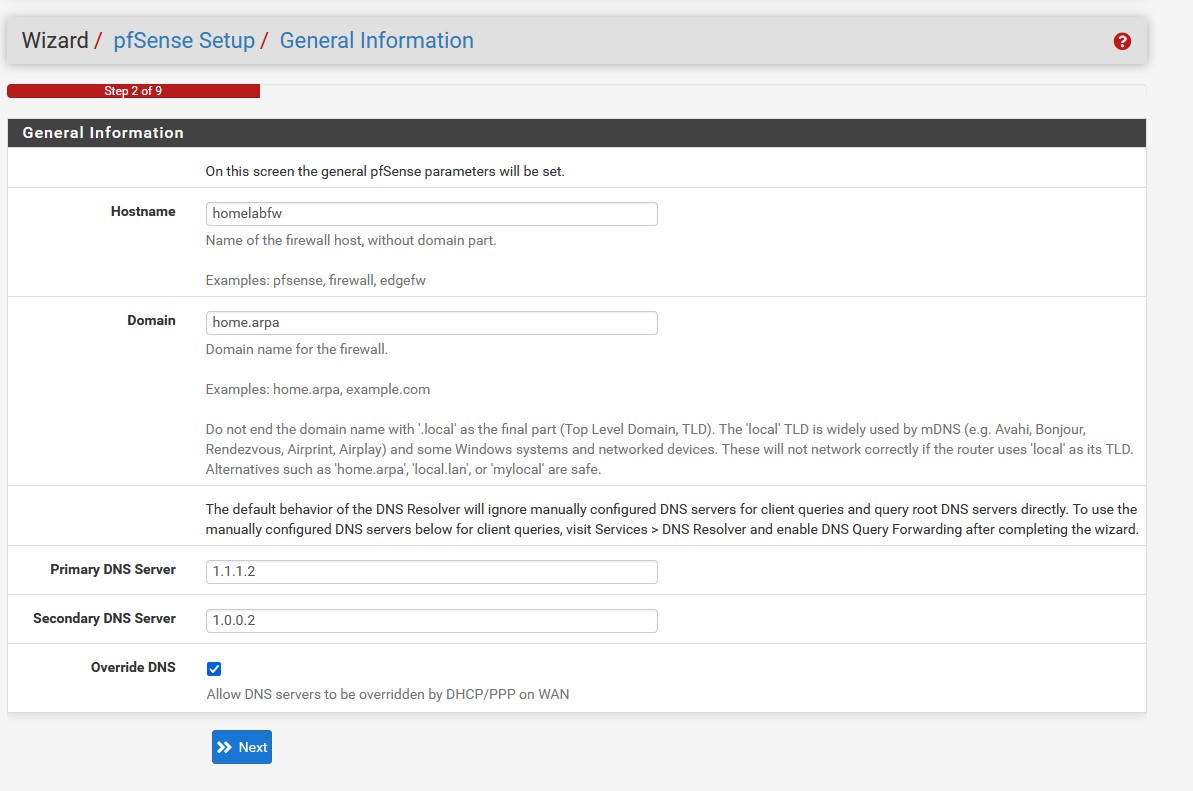
On the ‘General Information’ screen we have the option to change the name of our firewall, define a domain name, and set a primary and secondary dns servers. If you’d like to change any of these settings or use your own dns addresses, then go ahead and change them now. I will personally be using Cloudflare’s Secure DNS IPv4 addresses as they offer added malware protection. Note that we will have to enable DNS Query Forwarding if we don’t want our DNS configurations to be overridden. We also need to uncheck the ‘Override DNS’ box.
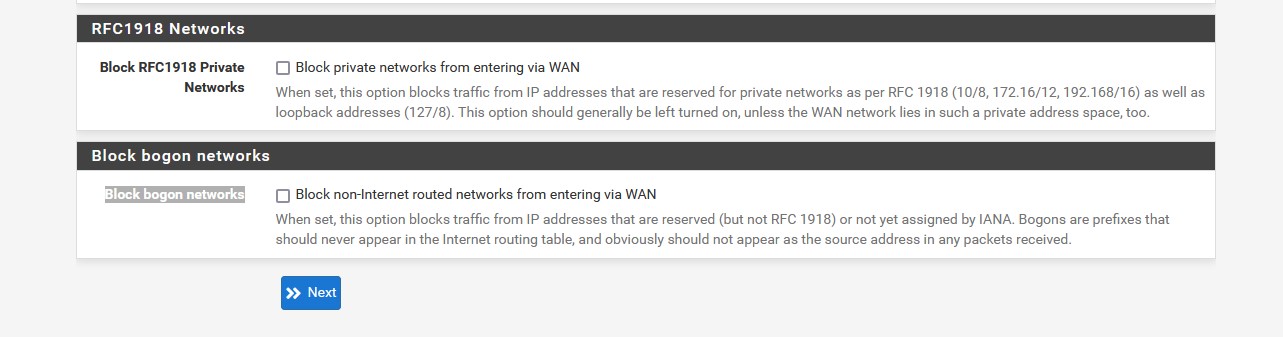
Leave the timezone screen as is unless you have internal NTP servers on your network. After that we have the ‘Configure WAN interface’ screen. We don’t need to mess with this page too much as we already did most of the legwork in the pfSense command line. We will let local DHCP handle the IP for WAN. We only need to uncheck ‘Block RFC1918 Private Networks’ and ‘Block bogon networks’ as we will be configuring our own default deny rules. The next screen involves the LAN interface IP. We’ve already set this, so we can skip this part.

On this screen we will need to enter a new admin password. Store it in a secure location such as a password manager. Click through to the next screen and refresh when you are asked. Wait for the setup to finish, and congrats you’ve made it through the initial webConfigurator setup. You will then be booted to the dashboard to accept the copyright agreement. On the dashboard is where we can view information about our system, disk usage, and which interfaces are connected to pfSense.
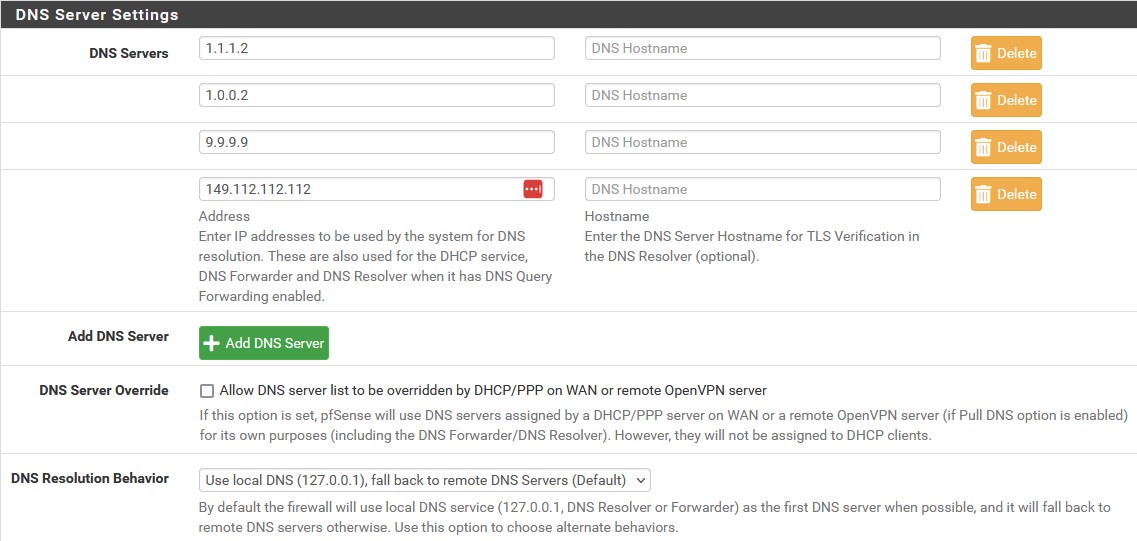
It’s always good practice to make sure pfSense is up to date. We can check the update status by going to ‘System’ → ‘Updates’ → ‘System Updates’. Everything should be up to date because we used the most recent ISO for installation. Before we added Cloudflares public DNS servers in the wizard, but we are also going to add some extra Quad 9 DNS servers. Under ‘DNS Server Settings’ make sure to add them below the Cloudflare addresses. We also need to make sure that ‘Allow DNS server list to be overridden by DHCP/PPP on WAN or remote OpenVPN server’ is disabled so that our servers are not overridden by DHCP. If you’d like to use dark mode, go to ‘System’ → ‘General Setup’ → ‘webConfigurator’ and there you can change the theme from the dropdown.


Enabling Network Services
We are ready to setup the services we wish to use. We will be making use of DNS query forwarding for caching, NTP for accurate time-keeping, and DHCP for static IP allocation (although we will get to this at a later part). Let’s start with DNS forwarding first since the setup wizard directed us to make DNS resolver changes in order to use the manual DNS servers we configured.
DNS Query Forwarding
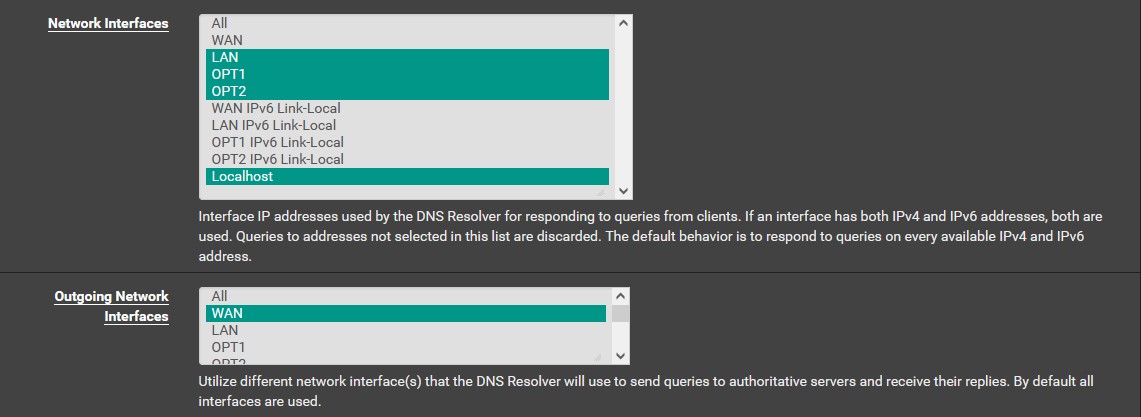
Head to ‘Services’ → ‘DNS Resolver’. The DNS resolver should be enabled by default. Under ‘Network Interfaces’, highlight ‘LAN’, ‘OPT1’, ‘OPT2’ and ‘Localhost’ by ctrl-clicking them, and then highlight WAN in ‘Outgoing Network Interfaces’. Check the box for ‘Enable Forwarding Mode’. You can enable DoT if you’d like, but I will not be doing so. Save and apply your changes. If you need to troubleshoot DNS issues then you can go to ‘Diagnostics’ → ‘DNS Lookup’ to run commands and make sure that connections are being established. If not, check the DNS addresses you set and make sure you didn’t make a typo.

Enabling NTP
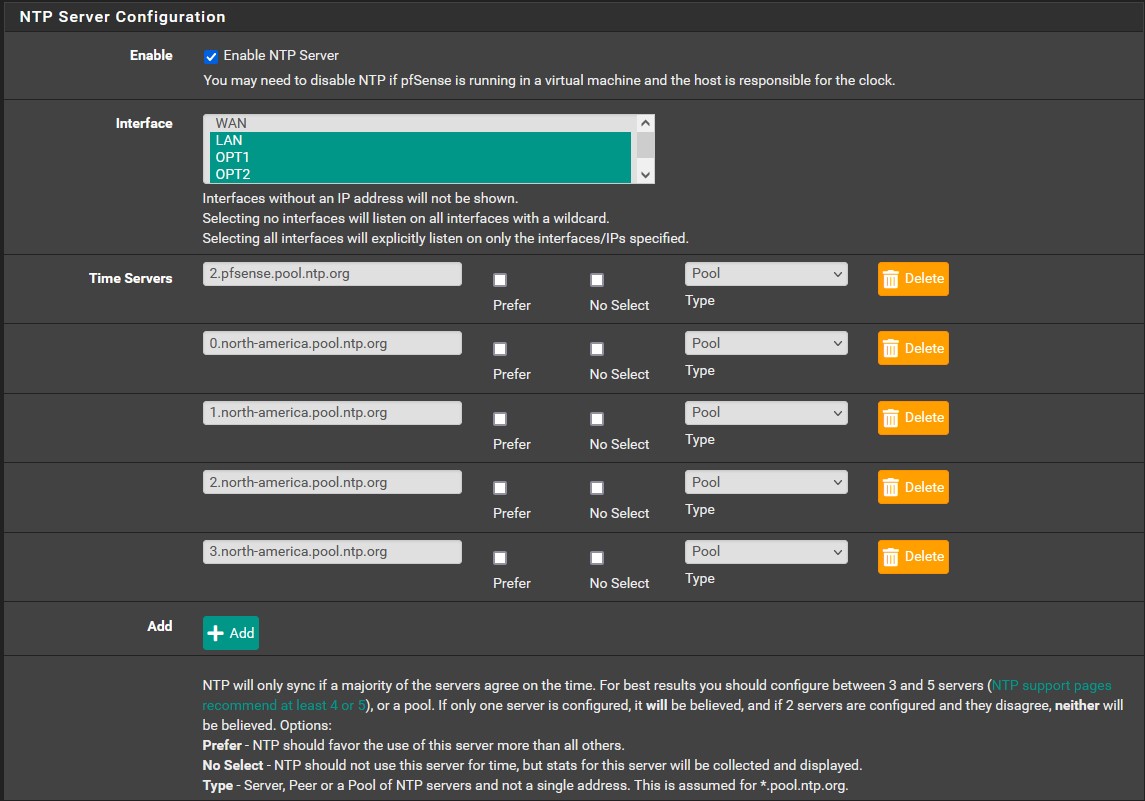
In the setup wizard we decided to use the pfSense NTP server, in this section we are going to configure it’s settings. NTP is used to synchronize clock times in networks. Many critical services require accurate time keeping to function properly. Go to ‘Services’ → ‘NTP’. ctrl-click ‘LAN’, ‘OPT1’, and ‘OPT2’. We are going to add some additional North American time servers from pool.ntp.org. They should all be of type ‘Pool’ by default, but if not then change them. NTP is now properly configured.
Firewall Alias and Firewall Rules
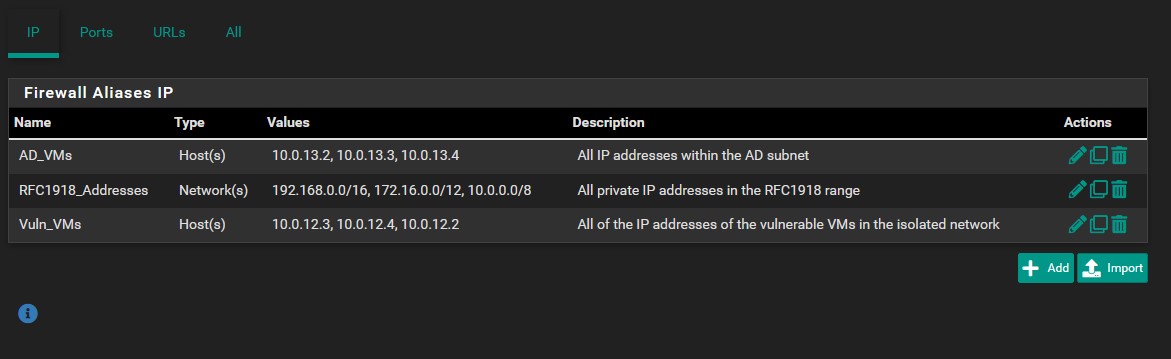
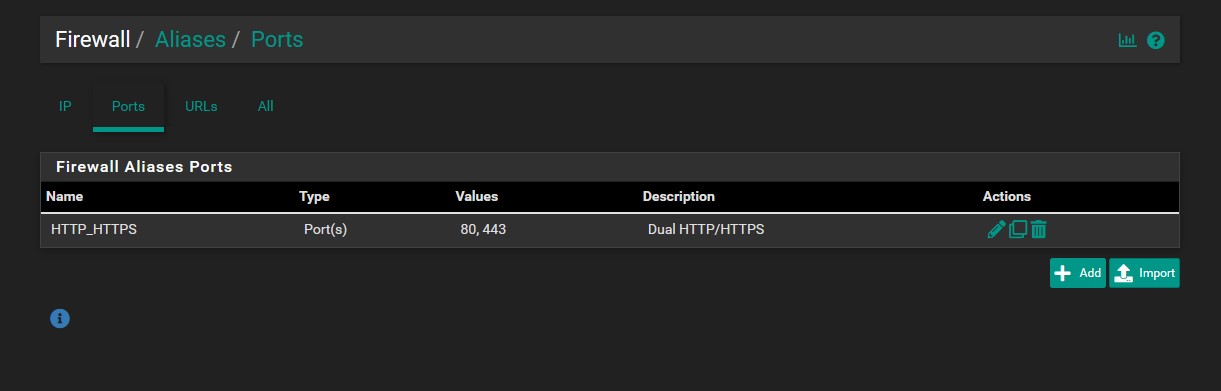
In pfSense, we are able to create aliases that allow groupings of ports, hosts, network ranges, IP addresses, and URLS under a single name. Instead of manually specifying multiple IPs for a firewall rule, we can simply point it to the aliases we create making firewall rule creation much less tedious. We are going to need to create several aliases. For that we need to go to ‘Firewall’ → ‘Aliases’. The ‘IP’ and ‘Ports’ tabs will be the main focus. Make sure your aliases looks identical to the ones below, and don’t forget to save and apply changes.
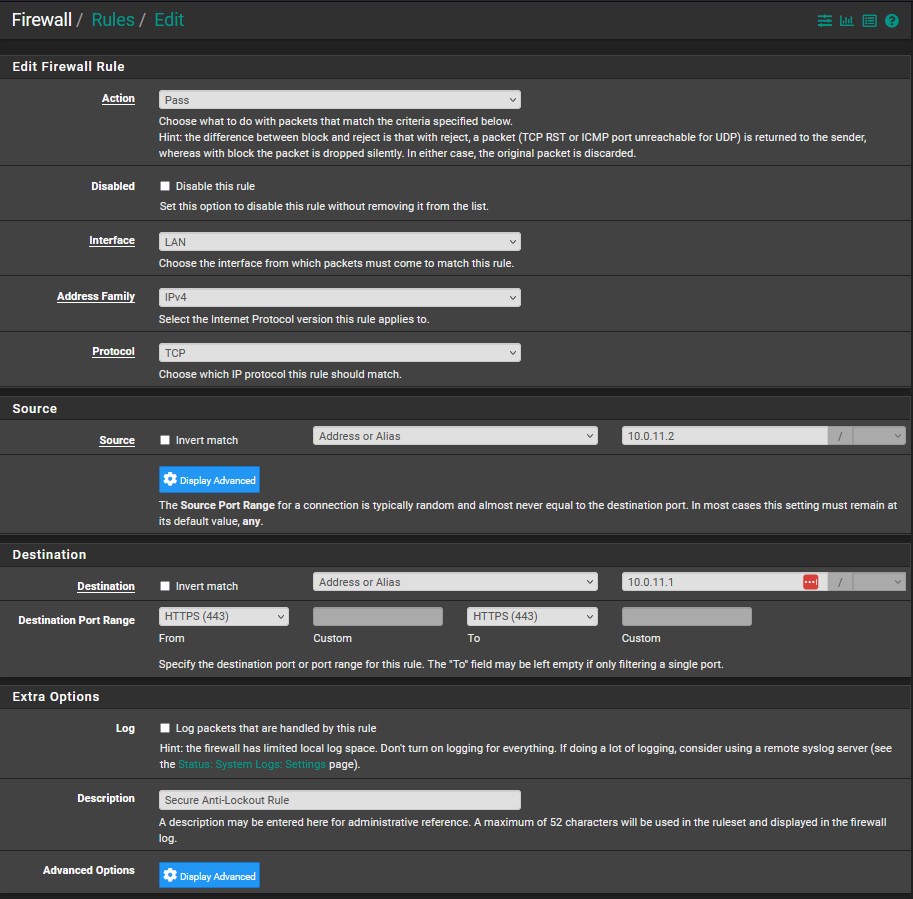
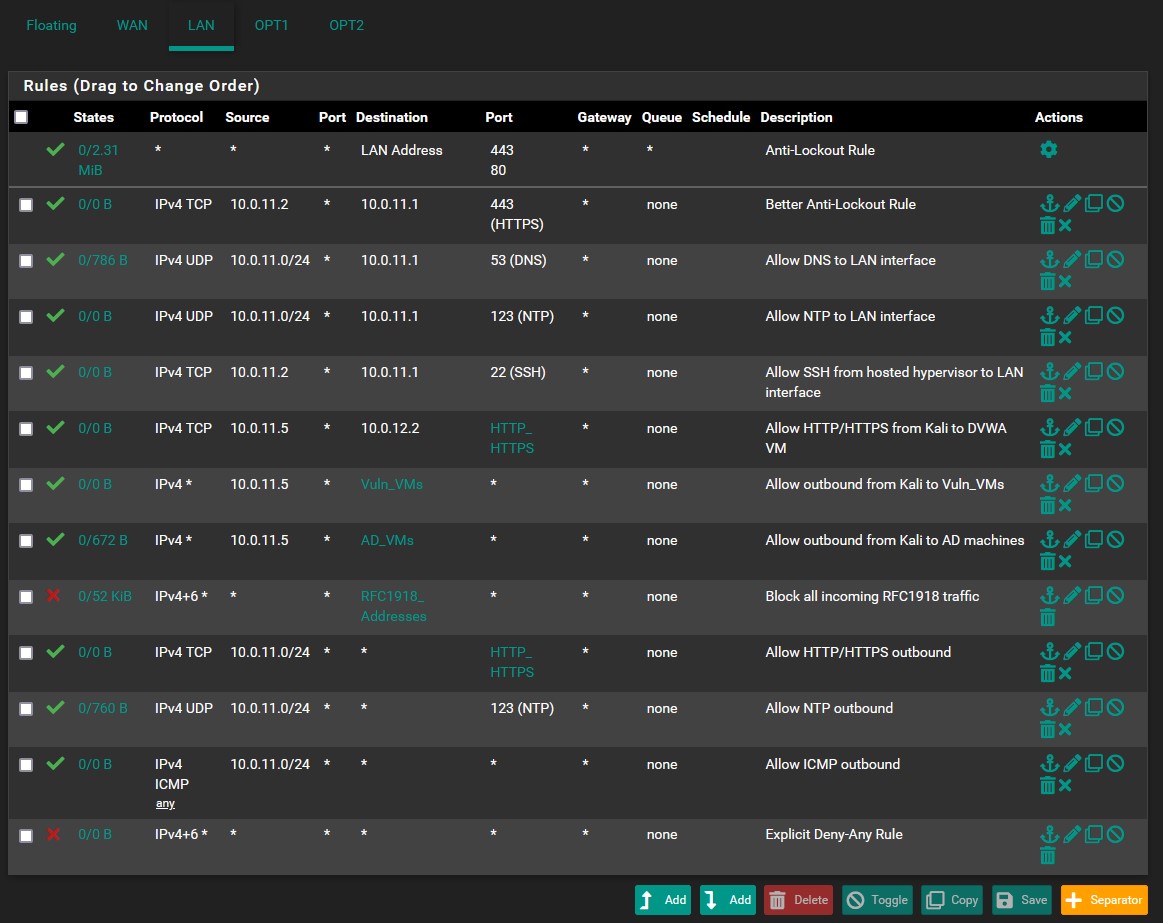
Now that our aliases are created, we can move onto creating the firewall rules. Let’s look at an example first. Head to ‘Firewall’ → ‘Rules’ → ‘LAN’. It is incredibly important to note, firewall rules are executed in a first to last, top to bottom order. We always need to be very careful about how we place them. When you arrive at the LAN tab, you will see three default rules. The topmost one is an anti-lockout rule that allows HTTP/HTTPS traffic to access pfSense on the LAN interface. The other two rules allow IPv4/6 outbound traffic from the LAN. We cannot drag the lockout rule around as it must always come first. Other rules are able to be placed in whichever order we choose. Let’s go ahead and delete the bottom two rules as we won’t need those in our LAN policy. Let’s also create a better anti-lockout rule as an example (We will be disabling the default anti-lockout rule later). Click on the anti-lockout rule and then the ‘Add rule to end of the list’ option (the add button with the down arrow marker). A new window will open in which we can create our rule. Make sure it looks similar to the image below. Save and apply changes.
Now that we understand proper firewall rule order and how to create rules. Let’s create our policies for WAN, LAN, OPT1, and OPT2 in that order. Make sure that your rules match the images provided. I will explain each rule-set as we go.
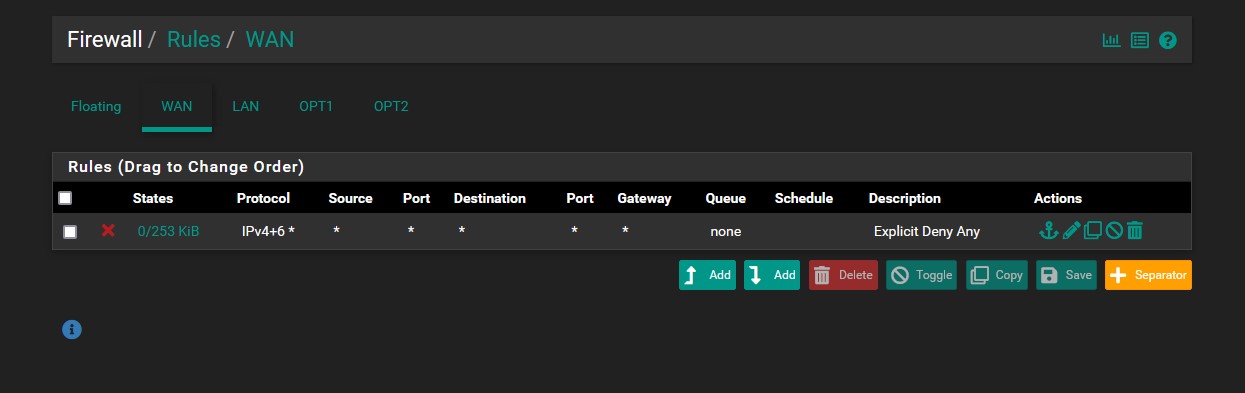
- WAN:
- The firewall will automatically create a default deny-all rule for inbound traffic to the WAN, but this rule serves as an explicit visual notifier
- LAN: (The default anti-lockout rule is not included in this list because we will be removing it later)
- A better anti-lockout rule that only allows us to access the webConfigurator via the LAN address at port 443(HTTPS)
- Rules for allowing VMs in the management network to access the DNS and NTP services
- A rule that lets the hosted hypervisor make SSH connections to our LAN interface
- A rule that lets the hosted hypervisor make RDP connections to our active directory network
- A rule for establishing an HTTP/HTTPS connection from our Kali VM to our DVWA machine. We will not be accessing the web application on the machine that DVWA is installed on, but through Kali instead.
- A rule for establishing any IPv4 connection from Kali to the vulnerable VMs
- A rule for establishing any IPv4 connection from Kali to the AD VMs
- An RFC1918 rule meant to enforce segmentation. It’s essential that we have all rules dealing with RFC1918 addresses above this rule so services or other important communications are not blocked.
- Rules that allow the management machines to make outbound HTTP/HTTPS, NTP, and ICMP connections
- An explicit deny-any rule that blocks all other inbound connections
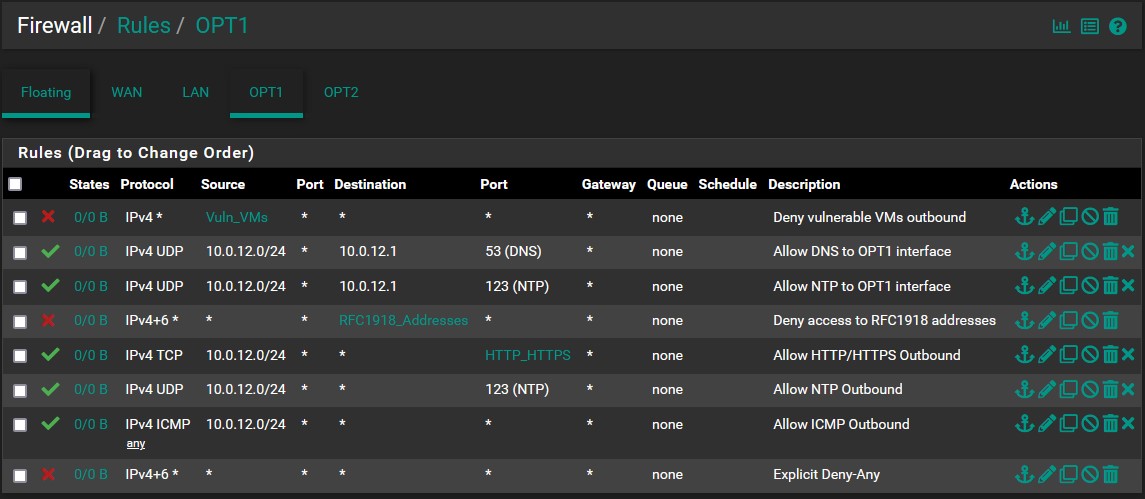
- OPT1:
- A rule to block our vulnerable VMs from making outbound connections, enforcing proper security in isolating the network from other segments and the internet
- Rule for allowing VMs in the isolated network to access the DNS and NTP services.
- An RFC1918 rule meant to enforce segmentation
- Rules that allow the isolated machines to make outbound HTTP/HTTPS, NTP, and ICMP connections
- An explicit deny-any rule that blocks all other inbound connections
You might have noticed that our vulnerable machines alias did not include the Linux machine that DVWA will be running on. That is because we need the machine to be able to use HTTPS/NTP so we can install DVWA. Once we have everything setup, we will be deleting those permissions and adding the machine to the vulnerable machines alias.
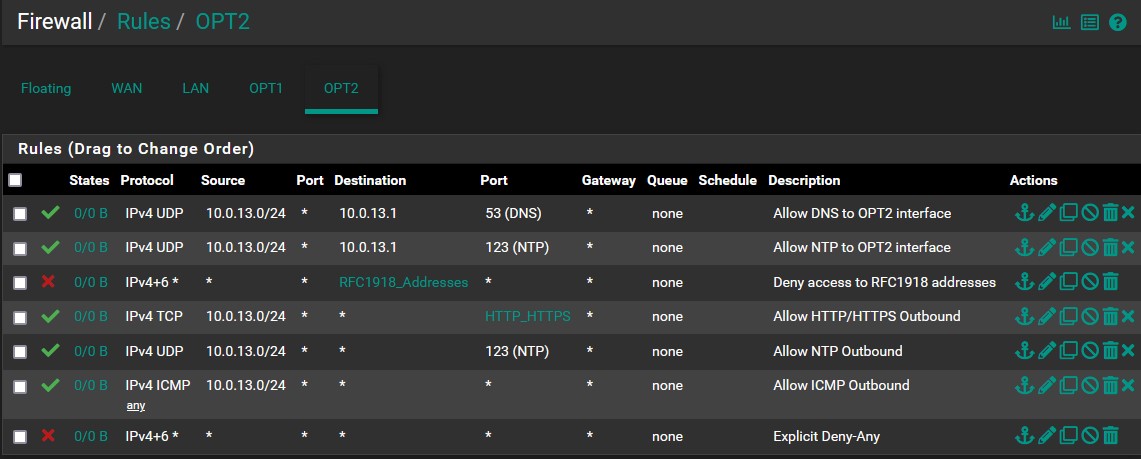
- OPT2:
- A rule that allows Winlogbeats traffic to be sent to the SIEM
- Rules for allowing VMs in the AD network to access the DNS and NTP services.
- An RFC1918 rule meant to enforce segmentation
- Rules that allow the AD machines to make outbound HTTP/HTTPS, NTP, and ICMP connections
- An explicit deny-any rule that blocks all other inbound connections
| Congrats, you’ve made it through all of the services and firewall setup! We can now move onto creating the management network virtual machines. You can find the next part, ‘VMWare Pro Homelab | Tsurugi & Kali Linux Setup’, in the [blog] section of this site. |